
Introduction
Torching a putter is one of the biggest and most classified trade secrets in golf. This skill set gives putter makers the ability to apply unique finishes to turn their putters into rare works of art that demand top dollar. Ok, only part of that statement is true. The fact is, torching a putter is really easy. It cracks me up when you see a high-end putter’s value go up exponentially because it has a “rare Tour Bronze or Gold” finish when all it means is that someone just spent a few minutes applying heat to steel. Anyway, given how easy it is, I thought I’d show you how to torch a putter. You’ll be customizing and refinishing your own putters in no time!
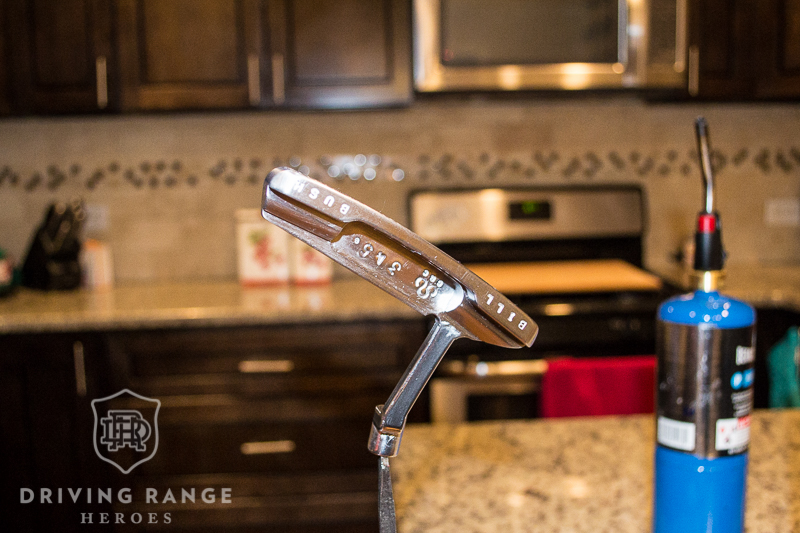
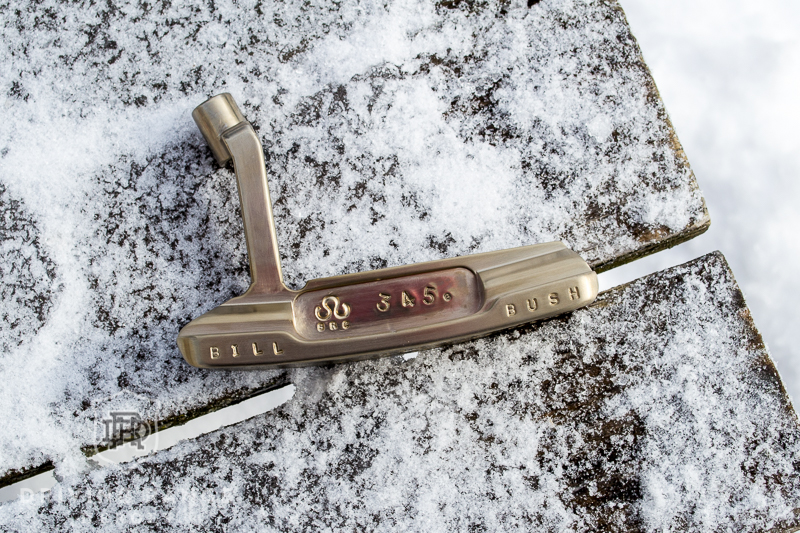
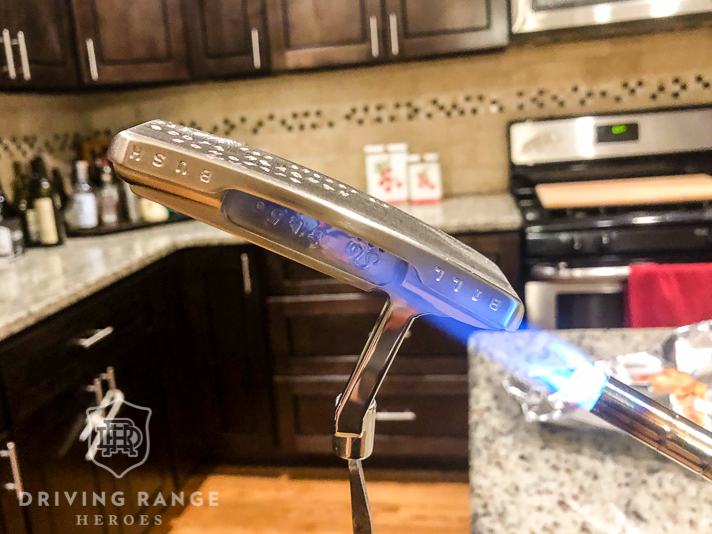
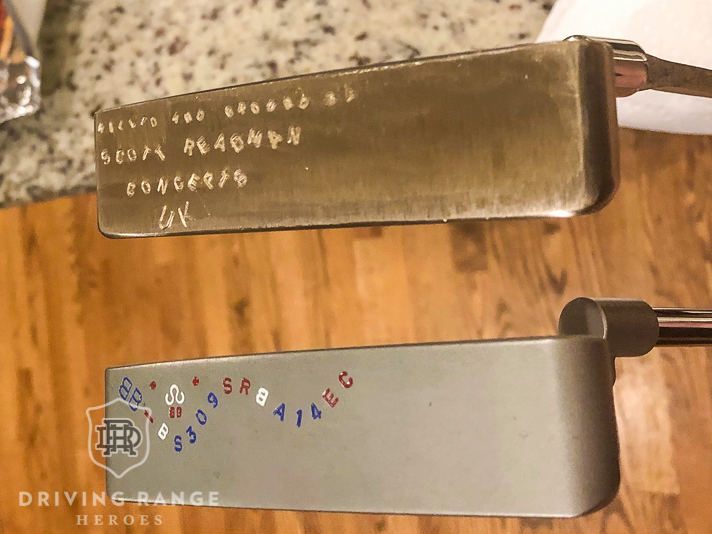
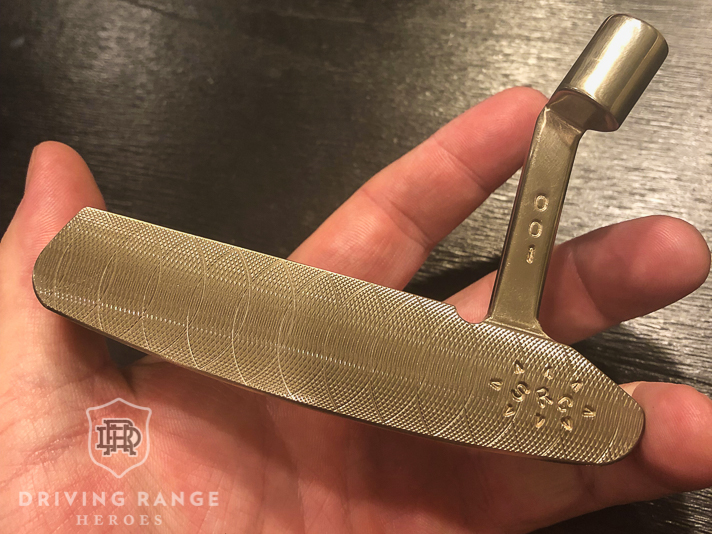
I’ll use my Scott Readman Concepts IKB2 Project Putter as an example.

It’s All in the Prep
The most important step in putter torching is the prep work. This ranges from sanding out imperfections to de-greasing the steel. Your first step is to get the putter into a “final state.” This is what you want the putter to look like when it’s finished (obviously minus the color change). One thing to keep in mind is that a higher polish will torch better. The blues and purples obtainable from torching come out much better in a high-polish finish. Just remember, a higher polish reflects more light – aka you’ll have more sun reflecting off the putter. The easiest color to achieve – call it a wheat gold – will look just fine with matte finishes.

Once you have the “finishing work” completed, you have to prep for the actual torching of metal. This is BY FAR the most important step so pay attention. If you don’t properly de-grease or de-oil the club, you’re torch job will not come out with the desired results! It’s imperative that you get the club head scrubbed very clean and free from any oil or grease. I wear latex gloves and scrub the club with a toothbrush and dish soap. Next, I use a spray bottle of metal degreaser (follow the instructions on the bottle) and scrub that with the toothbrush. Then I do one last pass of dish soap with the toothbrush. This will ensure you don’t have any imperfections once the heat is applied.
Following the cleaning, while still wearing latex gloves to avoid any skin oils from getting on the club, I get the club head completely dry with a soft towel that won’t leave lint behind. Make sure there is absolutely no water hiding anywhere as this will leave marks in the finish when you start torching.
Setting Up the Rig
I would recommend completing this process before you do all the scrubbing up above. I’ll tell you why in a minute.
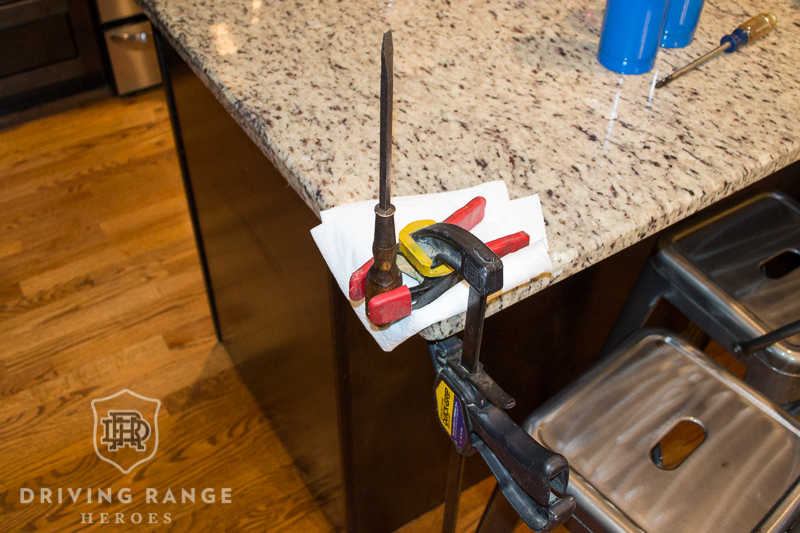
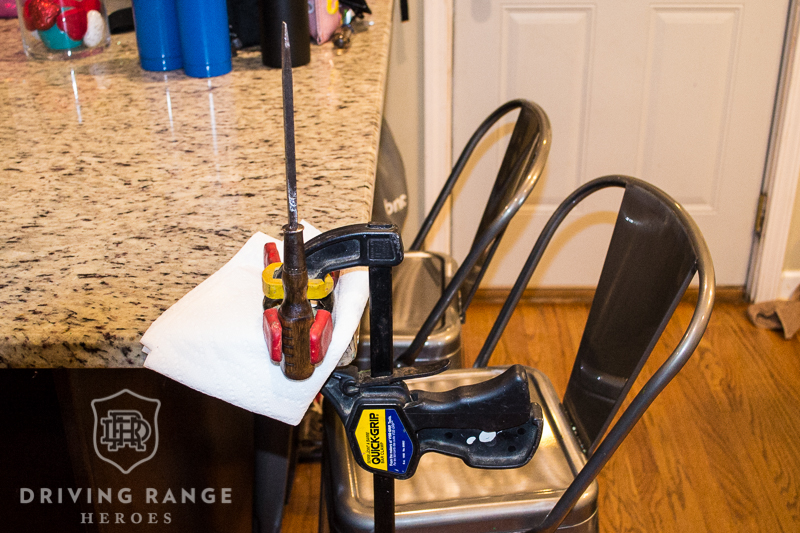
I’ve had success with a couple of different setups so I’ll share them both with you. Typically, I like to use a long screwdriver that fits into the hosel of the club head and will adequately support it. Your worst nightmare is your freshly finished putter that’s perfect falling to the ground and getting dinged up. As an alternative to the screwdriver, you could use an old shaft that fits inside the hosel of the club. For most clubs, this is probably the better option if possible. In the event you are doing a putter that has a post rather than a hosel, I like to use a pair of metal pliers that lock into place. (Just Google ‘metal locking pliers’)
Whichever implement you chose, lock it securely into your vise pointing straight up. I recently used an alternative solution (pictured above) due to my garage being way too cold. I put a screwdriver in a spring clamp, and then used a quick grip, or “trigger,” clamp to secure that to my countertop.
 Ok, you have your “rig” all setup, now you just need to put your club on it to get torching. Remember when I said you should set your rig up first? Wearing your latex gloves so as not to get any finger grease or dirt on your club head, place it onto your screwdriver or shaft and you’re ready to torch.
Torching Process
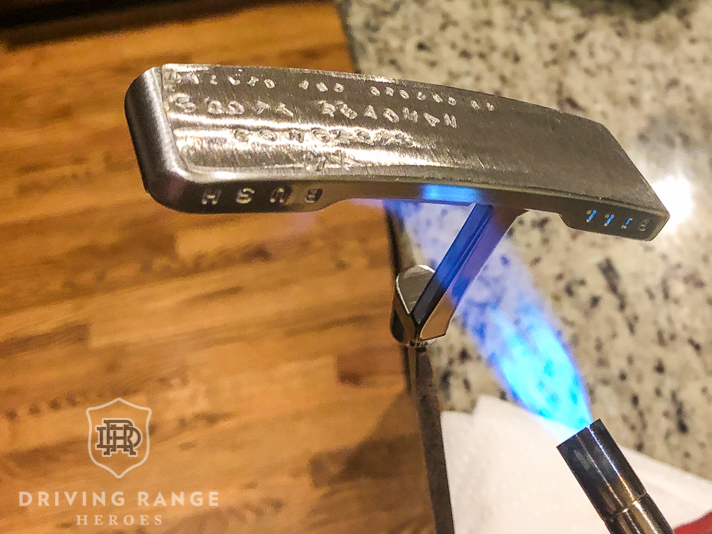
The actual act of torching might be the easiest part of the whole process. The biggest challenge is understanding what the heat will do to metal and the metal you’re working with. For instance, thinner areas will heat faster so if you want to have a uniform color, you need to take that into consideration. The key is to keep your heat moving around the whole club head and evenly heated. If you leave it focused in one place at a time, you will have inconsistencies and burn spots.
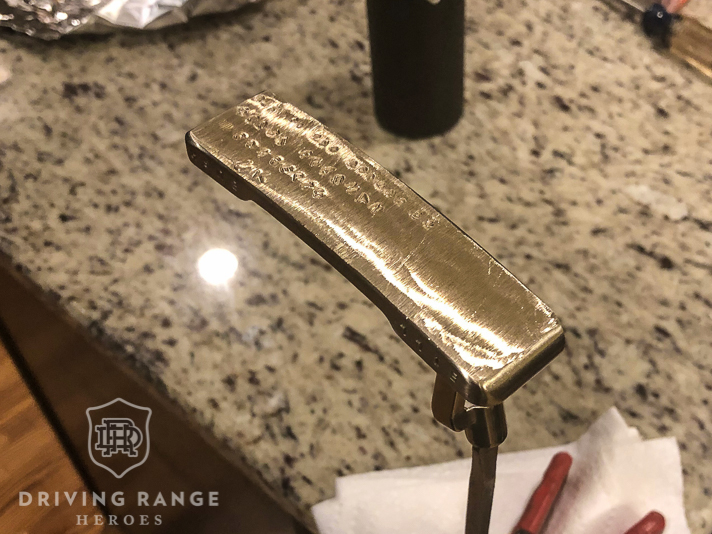
Your final color will come down to timing under heat. A wheat/gold/bronze finish is easily achieved in a fairly quick time frame using just propane. If you want the blues and purples, propane is doable but you need to keep your heat moving and it’s going to take a long time. I recommend a better heat source because it will be easier to keep the finish even AND it won’t take so long to do. I’ve heated putters to those colors before and it can take over an hour with just a basic Propane torch.
A quick pro tip: make sure you work in a comfortably warm environment. Your flame will be super weak and take forever if it’s cold out.
REMEMBER, KEEP THE FLAME MOVING EVENLY OVER THE GOLF CLUB!
Finishing & Cool Down
There are a handful of considerations to take for “finishing” your torched putter. Once you take the flame off of the head, the metal will still be hot and continue to heat. Think of it like a piece of cooked meat will continue to cook itself for a bit when you take it off the grill. Like that meat, your putter will cook a bit and the color can still change a bit.
Quenching
The quick way to stop that from happening is to “quench” the club head. Once you hit your desired color, you use your metal pliers to remove the head from your “rig” and put it in water. Some people will use old dirty motor oil for coloring, but I typically avoid this due to the whole risk of burning down my house thing because oil flames real easily. Whatever you choose, dunk it and leave it. If you run it under a sink or something, I suppose it could work, but my worry is you’d get streaks in the finish.
When you do a quench though, you get a rapid change in temperature. This will have a significant impact to the metal. I’ve found that putters I’ve quenched tend to feel “clickier” than they did before. You may experience this regardless after a torch, but it’s much more noticeable with the rapid change in temperature. At least in my experience.
Slow Cool
To avoid that extra clickiness, I like to be able to let the putter cool down on its own. All you have to do is turn your flame off and let the putter sit (still in position not touching anything) and give it time. This step could take some touch and practice because if you’re on the border of a color you don’t want, you may see some unwanted change. With a basic gold/bronze finish, you run little risk of that happening. Be aware that a slow cool down will take awhile. The darker you torch the putter, the longer it will take. Also remember, hot metal is dangerous and will burn the s*** out of you! While it’s cooling, make sure no one will bump into it. Kind of an oversight when I did the kitchen setup – thankfully no one was hurt.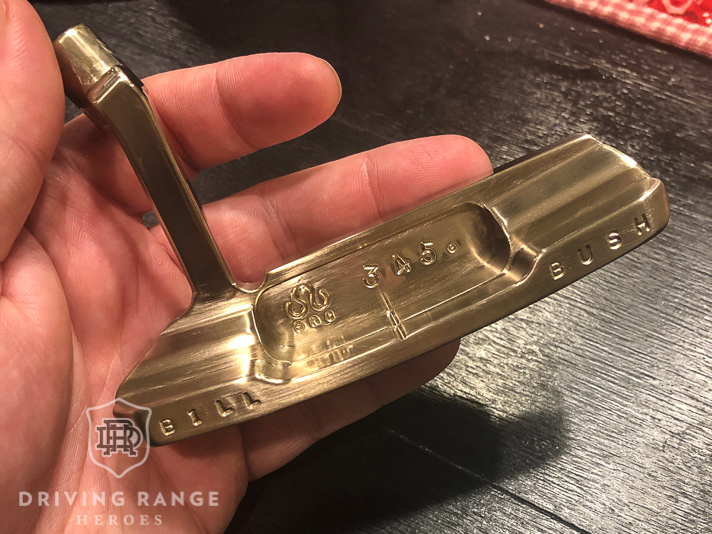
Final Thoughts
So there you have it. If it sounds daunting, I understand, but it’s easy. Like I said, it’s all in how well you prep the putter for the job. If you want a great result, you must put in the necessary pre-work. With some basic tools, and some common sense, you can have a unique custom putter of your own. The best part is, if you’re unhappy with the results, it’s easy enough to start over. Just sand off the finish and try again!
Supply List
Like most golf projects, there are multiple ways to go about torching a putter. There are bigger and better ways to do it, but below is a supply list if you want to have a go. The basic things you need are a high-heat source, and a way to safely secure the club head while not making contact with any surfaces.
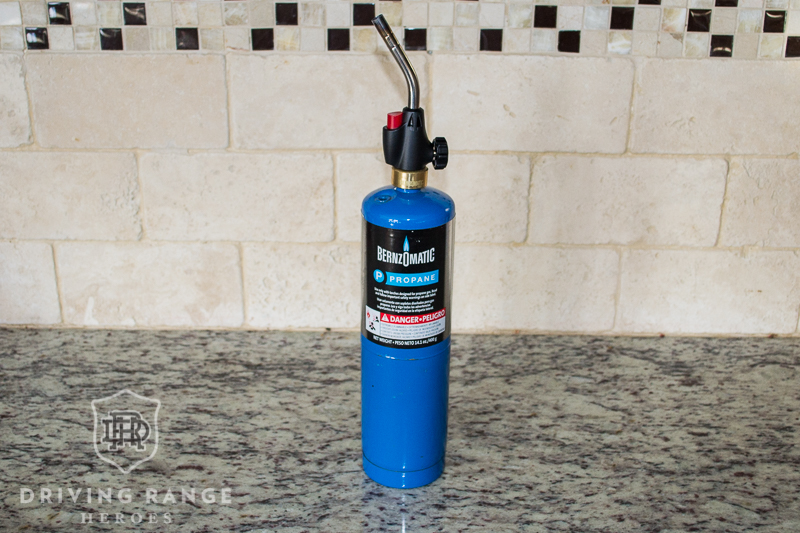
- Torch – Propane, MAP, Butane, etc…: When I was a kid, my dad always had some type of torch in the garage. It could have been Propane, Butane, whatever, but there was always one there. No idea what he used it for, but I just assumed it was a basic tool every man had in their garage. If you don’t, you can get a bottle of Propane and self-igniting torch head for like $20. This will get the job done. NOTE: A small Propane torch could take awhile to get the job done. If you’re planning on torching for deep blues and purples, go with something heavier duty if you don’t want to take forever and burn through a ton of gas. The pros all use MAP or acetylene regardless of the job. Just keep that in mind.
- Metal De-greaser, Dish Soap, & a Toothbrush: A torch job’s worst enemy is oil and grease. If there is any oil or grease whatsoever on the club during torching, your end product will be terrible. I use a steel de-greaser to get the putter head totally clean, and a toothbrush to do all the scrubbing.
- Surgical Gloves: See above. I use regular latex gloves for all de-degreasing and handling the putter before setting it up to torch. Don’t want any of your skin oils getting on the putter.
- Long Screwdriver or Old Steel Shaft: You can use this to put the putter on while you torch. This way all surfaces are exposed and won’t make contact with anything else.
- Vise: Pretty simple, you need something to securely hold whatever you chose up above while you torch.
- Metal Pliers: These are so you handle the club head while it’s hot. In theory, you shouldn’t have to unless you’re quenching, but just in case.
- Water or Fire Extinguisher: The whole process is pretty safe, but you never know when fire’s involved…


I just did this with a copper divot tool, how do you give it the sheen after you torch it without wearing off the torching you just did?
Wrong order. You have to polish it to a “high sheen” first, THEN torch it. Polishing is a process that removes layers of the metal. There’s no way to torch then polish and maintain the finish. You’d just have to re-torch.
Even when polished, copper over time will patina and will not “shine” anymore. Just keep that in mind.
Did you need to seal the putter after to protect against corrosion?
Nope. 1) I’m not too worried because it’s stainless. Carbon steel you’d also have to worry about it even without the torch so you’re still going to take care of it. 2) Torching isn’t a finish that lends itself to corrosion. That’s more with oxidized finishes like gun blue, black ox, oil can, etc…
Great looking finish on your putter with simple yet detailed instructions. I have previously torched my 2011 Scotty Del Mar with decent results. I purchased a Scotty Circa 62 model 6 to refinish not realizing that it had both chrome and nickel plating. I soaked it in muriatic acid to remove the chrome but have no way of removing the nickel in an inexpensive manner. I had hoped to get down to the raw carbon and gun blue it. I’m wondering if I can torch it now that it has the chrome removed and is nickel plated? Thx. Frank
I would not recommend it. Two reasons. I’m not sure how toxic nickel is when you torch it (or if it is). Also, it might bubble or not torch evenly. For many reasons, similar to what you have mentioned, I abandoned similar DIY projects long ago. Just isn’t worth it.
The putter looks really nice. Thinking of doing this on my wedges and was wondering if this process stops rusting or is purely for looks? also I don’t have a torch so will my oven work fine? thanks
Does NOT stop rusting. Don’t do it on a chrome finish either as it will/can bubble.
Under no circumstances do this in your oven. You don’t want those fumes/chemicals/pollutants where you make food that you eat. You can easily buy a MAPP or propane torch at any hardware store for like $20.
Can a putter (Scotty Cameron Phantom X 7.5) that has been “torched” be “UNTORCHED”?
Yes, there are a variety of ways, but basically you just need to have the top layer of material removed. So basically sanding and/or polishing it.
Bladesmith here don’t forget, many putters are coated with things such as nickel, chrome, and other things. These need to be taken off before you torch your putter. If not you could end up with some really bad chemicals in the air which are NOT good to breathe in. Doing it in a well ventilated area will not work either, these coatings need to be stripped period…have fun!
That’s a really good point. I definitely wrote this from the perspective of “raw” or “bare” carbon or stainless steel. I’ll go back when I get a chance and add a note in the post about it, thanks!
I have a Bettinardi Queen Bee #6. Can I torch this putter? Also if I dip it in two stroke motor oil with a mix of penetrating oil will it come out shiny?
I just did a google and it says the Queen Bee 6 has a PVD finish. (If you have the “caramel copper” one. That’s a plating over the stainless steel so you wouldn’t get a good torched finish on that. You’d have to remove the PVD finish first. Also, the oil isn’t what makes it shiny. You need to finish the steel into a high polish, then torch it.
There are a bunch of other posts about sanding/polishing if you look around the “Workbench” section of the site.
Thank you for the detailed steps. Was wondering, is it possible to torch a Ping Zing 2 without removing the head from the shaft?
I wouldn’t advise it.